Playing ARK: Survival Evolved is exciting, but choosing a decent ARK server host solution can be a challenge and could cost you a lot.
Good thing is you could go for the cheaper route of setting up your own ARK dedicated server. In this article, we will share how to host an ARK server in a detailed guide below to prevent you from spending unnecessary cash.
How to Host an ARK Server
Server Requirements
The first thing you must pay attention to when you decide to host an ARK server is the game server requirements.
Operating system
The operating system must be a 64-bit OS. Our team reiterates the need to have an operating system of at least 64-bit OS, because without an operating system of this data storage, you won’t be able to run the system.
For example, if you are running a Microsoft server, then you will need the Microsoft Visual C++ Redistributable and DirectX, both of which can be located in the Steam ARK game folder.
64-bit Linux servers need 32-bit binaries to install or run SteamCMD. The game server will also require glibc 2.14 or higher. This requirement is automatically satisfied by Ubuntu 14.04 (or newer versions) and Debian 8 (Jessie).
RAM
The RAM is another key element to your ARK: Survival Evolved game server’s smooth running time and you need at least 6 GB to ensure this. Our advice is to make sure you have at least 4 GB of RAM for every 100 players you host. Of course, you can feel free to increase the RAM to accommodate the more players you have over time.
Bandwidth
Hosting an ARK game server requires a fast and reliable internet connection. The upload speed should be 10 Mbps or more. And remember: more players means a higher bandwidth. Keep in mind that if you want to play ARK: Survival Evolved on the same PC used as a server, you will have frame drops and lags that will waste your time. It is better to use another device for playing.
Network
Steam only supports ports from 27020 to 27050. It means that you cannot use a query port from this range. ARK dedicated game servers listen to incoming connections on the following ports:
UDP 7777 – Game client port
UDP 7778 – Raw UDP Socket port
TCP 27020 – Remote control server access
UDP 27015 – Query port for the Steam server
You need to check that your network is configured to permit incoming connections to the above ports all the time. Also, the incoming connections have to be directed to the host.
Hosting environment
An important step is to decide whether you want to host your server locally or through a Virtual Private Server (VPS).
This decision should be made only after you choose the operating system of your server. A Linux user will require more RAM to build the ARK: Survival Evolved game server compared to Windows.
Decide Your Hosting Environment
After you ensure that your game server meets the minimum requirements, all you have to do is to set it up. This is an easy operation, especially if you are hosting the server locally on LAN – on the PC you are playing on and available only on your home network.
Hosting Your Local ARK Server on Windows
Before we elaborate on how to host an ARK server on Windows (PC or server), it is important to know the server requirements.
The operating system should be Windows 7 + (Windows 10 is preferred) for the PC or Windows Server 2012 + (Windows 2019 is preferred) for the server.
Your ARK server will also require a Quad-Core processor (single-thread performance preferred), with a server access to 8 GB RAM (although 6 GB memory suffices for 100 players), and 5 GB hard disk space.
We listed the steps you are required to follow for hosting an ARK server on Windows.
The first step is to get the game server files from SteamCMD. Two methods allow you to get these:
1. By program, using SteamCMD
You have to create a file where you want to store your ARK game server hosting files. Inside this folder, you will need to place the downloading SteamCMD.exe file. Then, you must create a batch file named SteamCMD.bat. The SteamCMD.bat file should contain the following code:
Right-click on the batch file and select Run as Administrator. The game files should be downloaded using Steam.
2. The second method is to locate the ARK game servers files on the hard drive. All you have to do is to follow these simple steps:
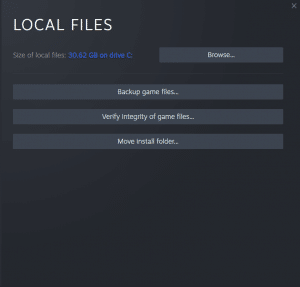
Right-click on the ARK: Survival Evolved from Steam and select the Properties option. Then, click on the Local Files tab and then click on the Browse button.
Setting up your ARK: Survival Evolved dedicated server requires you to create a batch file named ARK.bat in the previously created SteamCMD file (step 1) or your Steam common file (step 2).
In this batch you will have to place the following code:
Before running the batch file that will start up your server, you will have to customize some parameters: ServerPassword, ServerAdminPassword, MapName, and SessionName.
Hosting Your Local ARK Server on Linux
Setting up a Linux ARK game server is slightly different from Windows as you will have to use a shell file instead of a batch file and a different syntax.
Open a text editor and copy the code below for instant setup:
Next, save the file in the Linux server files folder. To start the server, open the terminal window and type the file name.
However, keep in mind that you have to check if you can run the script as Linux can be moody when it comes to security options. This check can be done by opening the terminal in the same location as the created file. Next, type in the following command that makes the file executable:
$chmod +x startserver.sh
You can start the server anytime by opening a terminal window from the folder and typing the following command:
./startserver.sh
Server Connected to the Internet
Installing an ARK: Survival Evolved game server connected to the Internet can be done via two methods: Steam UI or SteamCMD.
1. Steam UI
Other methods might give you more control over scheduled updates or restarts. However, for playing with friends, installing using Steam UI should do fine.
The first step is to open Steam and to navigate to Tools under the Library drop-down list. Scroll down until you find ARK: Survival Evolved Dedicated Server.
Right-click on this and choose Install Game. The location is \Program Files\(x86)\Steam\steamapps\common\ARK Survival Evolved Dedicated Server.
Now, all you have to do is to create a batch file with the following syntax:
After you customize the passwords, server name, and map, click on File, then on Save As. For Windows, keep in mind to alter the Save as type: to All Files then rename it under startserver.bat. Click on Save, and you are done.
For Linux, save the file as startserver.sh and make it executable – right-click on it, go to Properties and tick Allow executing file as program from the Permissions tab.
Windows users will just have to click on the batch file, while Linux enthusiasts will have to run the following command line: ./startserver.sh.
2. SteamCMD
The Steam CMD installation method is meant for power users or for those who use VPS servers. SteamCMD represents the command version of the Steam workshop client.
The feature is a little complicated, so our team recommends using third-party tools such as ARK Server Manager, ARK Commander, or BattleMetricsRCOM. These are easy to use features that allow you to spawn different entities like dinos or Steam workshop mods with a single command line.
Rented Server
If you choose to rent a VPS or a dedicated server and set up an ARK: Survival Evolved game server, this can be easily done. However, there are some features to which you should pay attention.
You do not control the 3rd party tools or their game servers, and you might experience hardware limitations, security requirements, or bandwidth limitations. Apart from that, the steps presented in this guide work fine.
Also, most server hosting providers have knowledge bases and customer service available to assist you with your queries. The best ARK server hosting companies offer FTP access and DDoS protection features to their customers. But it all comes with a price that might change your budget.
Configure Your Firewall
If you want other users to connect to your game server, you have to configure the firewall so it will not block them.
For Windows users, this is a very easy activity that requires only tweaking some settings:
Go to Start and type Firewall. Choose Inbound Rule, then New Rule. Select the Port and then click on Next. Choose TCP and then Specific local ports, then type 27020. Click Next, then select to Allow the connection, and click Next.
A new dialog box appears displaying three options: Domain, Private, and Public. Tick whichever is relevant to you, and then click on Next. In the Name area, type in ARK Server TCP and press on Finish the server settings.
The whole process will have to be repeated, but you have to make sure to select UDP instead of TCP. Under the specific local ports, make sure to include 27015, 27016, and 7777. Make sure you keep the same settings as before and name this ARK Server UDP.
After you configured the ports, the next step is to allow access to the game server. This is done by creating a rule – go into the program and press Next. Search for ShooterGameServer file and allow both public and private connections.
In case you are playing ARK: Survival Evolved on a local locations connection, you don’t have to configure any firewall. FTP access and DDoS protection are not for you to worry at this stage.
For Linux users, it is far easier to open the firewall ports. All you need to do is to copy the following command line in your terminal:
Sudo ufw enable
sudo ufw allow 7777/udp
sudo ufw allow 27015/udp
sudo ufw allow 27016/udp
sudo ufw allow 27020/tcp
Next, you need to enter sudo iptables-L and look under Chain ufw-user-input for the different ports.
Port Forwarding
Let’s proceed to the next step on how to host an ARK server. After you have configured the firewall, you need to open the inner firewall for your router locations to accept connections from outside your network. This is a technical process that depends on the router’s model. You might even need admin access, which is best for an instant setup.
To find details on how to open your router’s firewall [1], you can perform a Google search for your specific router model or visit portforward.com.
It is essential to keep in mind that hosting users outside your network and different locations implies security risks, so you should use port forwarding only if necessary. The ports that need to be opened are 27015, 27016, and 7777, for both UDP and TCP. Just ensure that your port forwarding is correct to prevent the “Waiting for Publication” message on Ark’s Server Manager from appearing.
Configure Automatic Setup
Once you build your ARK server, you will want to have it online as much as possible regardless of locations. Configuring the automatic startup for Windows is easy. You need to go to Start and type Task Scheduler. On the right-hand menu, click on Create Basic Task. Name the task ARK Server. You have the option to leave a description. Click on Next and tick When thecomputer starts. Under Action, select Start a program and navigate to the batch file you created earlier, startserver.bat.
This file can be found in Program, (x86)\Steam\steamapps\common\ARK\ShooterGame\Binaries\Win64\startserver.bat.
Click on Next, and make sure you tick the Open the Properties dialogue for this task when I click Finish option. If you click on finish, you will reach the General tab. Here, under Security options, tick the Run whether user is logged on or not checkbox. Also, tick the Run with the highest privileges checkbox.
Under the Configure for drop-down list, select your operating system and press on OK, and you are done with the server settings.
For the Linux operating system, this operation is very similar and faster than for Windows. All you have to do is to open Startup Applications. On the right-hand side, click on the Add option, and a new window will open. In this window, put the name of the ARK server and browse to the shell file locations. For SteamCMD users, one of the locations is /home/Ubuntu/arkserver/ShooterGame/Binaries/Linux.
Click on Add, and now your server will start on login.
Updating your ARK server with new releases is a straightforward process, just as you normally do with any reliable Ark server host providers or software. Click on the update button whenever a new build is available. Users on LAN can install the latest version with any game update.
Backing up your server data is very easy even without a live chat support to walk you through. As a server host, the first time your ARK server hosting is run, you will get a folder named ShooterGame/Saved. This folder contains various configuration and saved files.
To backup your ARK server before updating it to a new release, all you have to do is copy the previously mentioned folder and all its content to the chosen backup location.
You can host a server on ARK PS4, by paying a hosting provider. Sony will not share the security keys required for a dedicated server with regular users.
How much is it to host an ark server?
It can cost up to a couple of hundred a month to host an Ark server, depending on the number of users and the hosting provider you choose.
Are Ark servers free?
ARK servers are free only if you decide to get and host the servers, like non-dedicated servers of ARK, by yourself. You will only have to pay for electricity and the Internet. Renting a VPS or dedicated server is not for free.
How do I host my own ark server for free?
You can host your own ARK server for free but you will have to pay for renting a VPS or a dedicated server.
Hosting an ARK server is not easy; however, it can bring you a lot of satisfaction as a server host. Most adjustments can be done using a control panel and DDoS protection is often free. Keep in mind that you will constantly have to maintain and backup the server.
However, if you are looking for an Ark server, you can check the following list too!
Mathew has nursed a love of video games since childhood. Now, as an adult, he enjoys playing challenging games as much as he enjoys relating with other gamers. Matthew created Hypernia to give gamers like himself accurate and reliable information about games, servers, communication protocols, and much more.