If you’re a seasoned gamer, you know that there are different levels of difficulty on video games. But what are the difficulty levels on 7 Days to Die?
Here, our gamers will share the various difficulty settings in the game and how they can affect your gameplay. If you’re looking for challenge or an easier experience, you’ll find out which setting is right for you here.
What Does Difficulty Mean on 7 Days to Die?
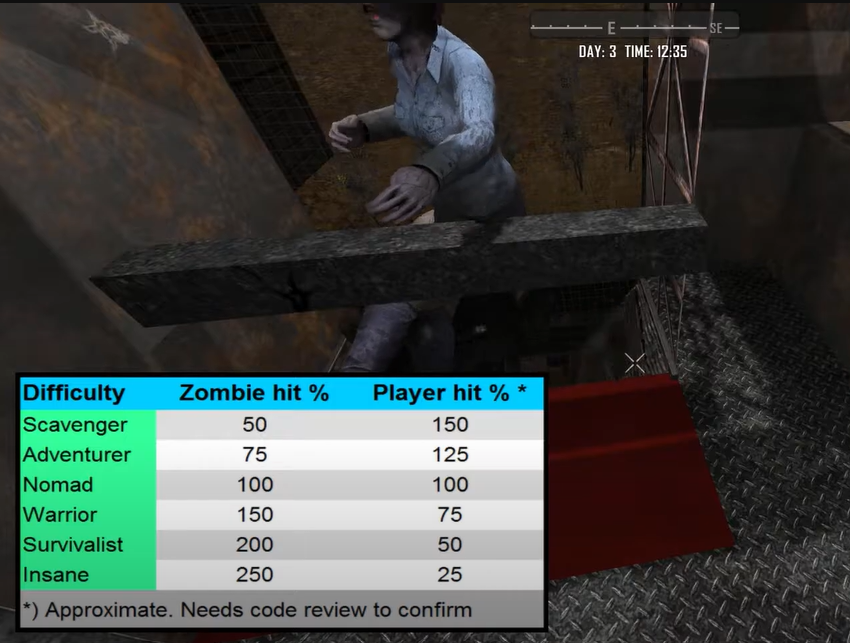
Difficulty modifies the power of spawned zombies in your game. A player can choose between six levels of difficulty:

- Scavenger (Easiest Skill)
The easiest setting, intended for absolute beginners
- Adventurer (Easy Skill)
More challenging than the easiest level
- Nomad (Normal Skill)
Designed for players with FPS game experience
- Warrior (Hard Skill)
More challenging than the normal mode

- Survivalist (Harder Skill)
Even more challenging
- Insane (Hardest Skill)
The hardest level
Aside from the effects on Player vs. Zombie and Zombie vs. Player damage, the game difficulty has an effect on the computed Gamestage used for players.
This defines the horde (sleeper, wandering, blood moon [1], scout) the game spawns at the appropriate times.
How to Change the Difficulty of Your 7 Days to Die Server
The majority of your 7 Days to Die Server’s customization will be done through its 7daystodie.properties file, including adjusting the difficulty. You can choose from the five different difficulty levels we mentioned above by doing the following:

- Stop your server by logging into your Control Panel.
- Go to Files > FTP File Access and enter your Multicraft password.
- Locate 7daystodie.properties and then click the Edit button on the right.
- Set the Game Difficulty property to the desired level of difficulty.
- To apply the changes, click Save at the top of the screen and then restart your server.